Monday, September 28, 2015

How Fast does Buffalograss Spread?

buffalograss on August 24
3 growth stages of buffalograss, picture dated Aug 24, 2015
buffalograss 3 stages of growth
Same view of 3 growth stages of buffalo grass,
picture dated Sept. 28, 2015
Established buffalo grass planted July 2014 in foreground, buffalograss planted from plugs June 25 (13 1/2 weeks ago) in center of picture and buffalograss planted August 3, 2015 (8 weeks ago) at top. As you can see, buffalograss spreads quickly. After it is established, water infrequently but deeply. Fertilize twice in the summer in June and August.

buffalo grass growth rate
Buffalograss from plugs planted June 25, 2015, left, and
August 3 2015, right. Picture taken August 24, 2015
buffalo grass picture taken September 28, 2015
Buffalo grass plugs, bottom of this picture, planted Aug. 3, 2015,
top of  this picture, buffalo grass planted June 25, 2015.
This picture was taken Sept. 28, 2015.
Buffalograss plugs planted 18 inches apart Aug. 3, 2015.
Picture taken 3 weeks later, Aug. 24, 2015

Same view of Buffalo plugs planted Aug. 3, 2015,
now 8 weeks after planting. Picture taken Sept. 28, 2015
We prepared the soil by spraying weeds with herbicide as they came up every few weeks for the past year. We are still fighting wild morning glory (field bindweed) and have trouble with redstem filaree (Erodium cicutarium).
redstem filaree erodium cicutarium weed in buffalograss
Redstem Filaree (Erodium cicutarium) 
The photo above is from swcoloradowildflowers.com. This is an excellent website with beautiful pictures of wildflowers. This is a beautiful picture, but I hate redstem filaree! One plant produces thousands of seeds and they germinate as soon as you begin irrigating an area.

Update on Buffalo Grass September 28, 2015

Our buffalo grass is growing well.
Buffalo grass planted on June 25, 2015 (13 1/2 weeks ago)
As you can see, the buffalo grass pictured above has filled in nicely in the 13 1/2 weeks since we planted it. See the post "Update on Buffalograss August 24," below to compare pictures.

Buffalo grass 3 stages looking west

Buffalo grass 3 stages looking east
Buffalo grass planted June 25, 2015
is about 19 inches long.
(13 1/2 weeks ago)
 
Buffalo grass planted 8 weeks ago on August 3, 2015


Monday, August 24, 2015

Progress of Buffalograss August 24, 2015

Buffalograss Planted summer of 2013
Our buffalograss has grown very well the past two years. We have not mowed it yet this year. This photo was taken in the same place as the last photo from September 19, 2013. (See post from Sept. 19, 2013 below)

Buffalograss planted June 25, 2015 foreground;
buffalograss planted summer 2014 background
We planted our buffalograss 18 inches apart on our level ground. It fills in nicely in one season. The grass in the foreground was planted about 2 months ago and has almost filled in completely.
Buffalograss planted July 2014
After a very wet spring, we have watered our established buffalograss only 3 times. It has turned brown on top, but is green underneath.
Buffalograss 19 inches long
Legacy Buffalograss is prostrate. Instead of growing upright, it creeps along the ground. Our established buffalograss planted in 2013 and 2014 has long stolons that have grown since this spring to 18 to 20 inches in length. It is growing in mounds and is about 6 inches deep. It has not been mowed this year. It was mowed very short last fall after it became dormant. It should be mowed in the fall so in the spring, the sun can warm the soil and dormant roots. This helps it to break dormancy and begin growing earlier. 

Thursday, September 19, 2013

Progress of Buffalograss Sept. 19, 2013

Buffalograss planted June 6, center of picture,
plugs planted on Aug. 15, 2013 at bottom.
The buffalograss planted 15 weeks ago on June 6, 2013 (middle of picture) has spread nicely and there are no gaps. It looks thick like the grass planted in August 2012 (top of picture). The bottom of the picture shows buffalograss plugs planted on August 15 (5 weeks ago). All these plugs were planted one foot apart. The plugs planted one foot apart will spread to completely cover an area if planted early enough in the growing season.

The buffalograss growing at the edge of the building has completely covered the burlap fabric. It looks like I didn't put enough topsoil along the edge of the building where it had eroded so badly. Next summer, I will gradually add topsoil to that edge until it is slightly higher than the soil that didn't erode away. The grass should slowly grow into the topsoil.

Next summer we plan to plant our buffalograss plugs 18 inches apart because the ground is more level in that area. That way, we will need about 56% fewer plugs. We'll see if the buffalograss plugs can spread and cover the area next year. This summer, we have been irrigating the area where we will plant new plugs next summer and spraying the weeds as they germinate, hoping to lessen the terrible weed invasion we had last year after we planted our new grass plugs.


Monday, September 16, 2013

September Weeds in Buffalograss

I have discovered a way to spray pesky wild morning glory (field bindweed) in our buffalograss even if the temperatures are still hot.
Field Bindweed held in place with a clothespin over plastic ice
cream bucket lid.
I take old lids from ice cream buckets, put them down on the buffalograss next to the bases of the weeds, and drape the morning glory over the top of the lids. I pinch the stems and the edge of the bucket with a clothespin then spray Trimec over the weed. I let it dry and carefully remove the clothespin and bucket lid. So far, there appears to be no damage to the buffalograss when I do this, even when it is above 85 degrees. I am very careful to spray only the weeds. Try not to damage the stems of the weeds so the poison will absorb into the leafs and go down into the roots. In a few days, the morning glory begins to wilt and curl and eventually dies.

Thursday, July 11, 2013

July 11, 2013 Buffalograss

Buffalograss plugs planted about June 6 at bottom, established grass at top.
     The buffalograss continues to grow quickly. It has spread nicely and is very thick in the established area planted last August. There are just a few small bare spots. The newly planted (about June 6) plugs at the bottom of the picture are spreading very well also. I put 1/4 teaspoon Osmocote from Scotts Miracle-Gro company (resin-coated controlled-release fertilizerin the base of each hole before I put the plugs in place.
   I have spot-sprayed 2-4 D on the wild morning glory as it pops up through the bufffalograss, but the 2-4 D has yellowed the buffalograss where I sprayed, even though I've been careful to not spray unless the temperature is under 85 degrees. Use caution with 2-4 D!
     We haven't mowed the buffalograss yet this summer but we think we might mow it the next few days. We'll see how that works. It is only 6 inches high at the thickest areas because it spreads horizontally and doesn't get much taller than about 4 inches.

Saturday, June 15, 2013

June 15, 2013 Buffalograss

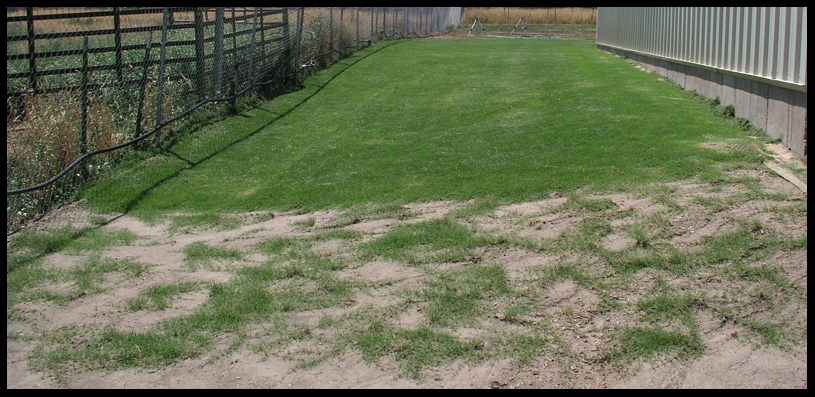
New Buffalograss plugs at bottom, Buffalograss planted last August at top.
Burlap covering topsoil along the base of the building on right side.
     During the late fall and early spring, we sprayed the grass-like weeds that were still green after the buffalograss went dormant. This worked great. We no longer have those weeds competing with the buffalograss. There are only a couple of spots where thick-bladed grass is growing. I will carefully paint some Roundup on those with a small paint brush, being careful not to get any Roundup on the buffalograss.
     The buffalograss came out of dormancy about a month ago. It has really started spreading now that the weather has warmed up. I have been spot spraying using a household spray bottle with lawn weed killer with Trimec herbicide, 4 tablespoons per gallon of water to kill broad leaf weeds. Always be sure to read the instructions on all herbicides you use. Buffalograss instructions say not to spray 2-4 D products when the temperature is above 85 degrees, because it may harm the grass. We really had a bad infestation of field bindweed, or wild morning glory, especially in the back area of the picture and the 2-4 D has really killed it well.
     I spread lawn fertilizer, 25-5-10 with slow-release nitrogen, 1 pound per 1000 square feet about a week ago. I will spread some more again in late July or early August.
     We sprayed Roundup on anything green in the area in November and again until early April. After spraying in early April, I looked closely at the buffalograss and it looked like it was coming out of dormancy. I was really scared that we had killed the buffalograss with our last spray of Roundup, but in May it really began to turn green so we hadn't killed it! Phew!
     We don't want to over water the buffalograss, so we have only watered it twice since it greened up.
     Water runs off our building and eroded a lot of the dirt away since last summer. There was a depression about 8 to 12 inches wide and 6 to 8 inches deep all along the building at the base. To remedy that, I bought  burlap fabric, 3 feet wide and 20 feet long and topsoil at Walmart. They also sell burlap at Home Depot and Lowe's. I put one side of the burlap down into the hole and dumped the topsoil into the depression. Then I folded the rest of the burlap over the top of the topsoil and pushed landscape pins into the burlap every couple of feet. So far, it has kept the soil in place and hasn't eroded anymore. The buffalograss is starting to grow into the burlap and the burlap will eventually decay away, hopefully after the buffalograss spreads its roots into the soil so it doesn't erode anymore. That's the plan, anyway.

Saturday, November 3, 2012

November 3 Buffalograss, Semi-Dormant

We have had one hard frost this growing season. The buffalograss is mostly brown, but there are still green leaf blades, so we don't dare spray Roundup on the green weeds surrounding the buffalograss yet.
Brown Buffalograss in Foreground,
Green Weeds in Background. Notice the erosion along the
base of the building.
Still some green in the Buffalograss

Wednesday, October 3, 2012

Buffalograss Progress

Our Legacy Buffalograss is still alive and spreading. We have had temperatures about 10 degrees above normal in our area the past few weeks. We expect below freezing temperatures in the next few weeks then our grass will go dormant. If any weeds are still green after the buffalograss is completely dormant, we'll spray them with Roundup.

Legacy Buffalograss on October 3, 2012
Individual buffalograss on October 3, 2012. It has grown quite a bit since
we planted it August 3.

Friday, September 14, 2012

Weed Problems in Legacy Buffalograss

The buffalograss was planted 41 days ago and there are many patches of a thin-bladed grass-like plant that has started growing from dry root-balls that looked innocent enough before we planted. We should have removed all the root-balls before we planted. Here's a photo of the dry root-balls and of a watered root-ball.

(Right) Innocent-looking dry dormant root-balls we left in the soil.
(Left) Grass or Sedge sprouting from a root-ball after we watered the area.
The photo below shows the buffalograss plugs on the right and the weedy grass-like plants on the left. If the root-balls dry out on the weedy grass, the grass dies back. The roots aren't very deep and have little bulbs on the ends.  We think it's a cool-season grass or (sedge?) that we hope we may be able to spray with Roundup when the buffalograss goes dormant after frost. Anyone know what plant this is and how we can get rid of it?

Buffalograss to the Right of Hose.
Weedy Grasses and Field Bindweed on Left.
We think the weedy grasses aren't growing next to our fence because we treat the area frequently with Roundup. If you have time, prepare your soil before planting your buffalograss by watering, spraying weeds with herbicide, watering again, spraying, etc. for at least a few months. It will save you a lot of trouble!

Field Bindweed (wild morning glory) is a big problem in our area and we will really have to fight this weed for a long time.


Thursday, September 6, 2012

September 3, 2012 Photos of Legacy Buffalograss Plugs

Legacy Buffalograss Plugs after growing for approximately one month.

Legacy Buffalograss Plugs Sept. 3, 2012


Legacy Buffalograss, Individual Plant Sept. 3, 2012
You can see that the plants are beginning to grow stolons that are several inches long. These stolons are beginning to root into the soil at several nodes.

Monday, September 3, 2012

August 4, 2012 Photos of Legacy Buffalograss Plugs

We ordered 13 flats of Legacy Buffalograss (1274 plants in all) and they arrived on August 2. We have a fairly steep slope from our building to our neighbors' property and thought that we needed to plant grass to help prevent mud and debris from washing onto our neighbors' property during rainstorms.

We planted the plugs about 1 foot apart, hoping that they would spread fairly quickly.

Newly planted Plugs of Legacy Buffalograss August 4, 2012


Individual Legacy Buffalograss Plug August 4, 2012

Sunday, September 2, 2012

Homemade Bread

I can't find bread pans with high sides, so when I make bread, I put a piece of aluminum foil (30 by 6 inch, folded in half to 3 inches) around the bread pan right after I put the bread dough in the pans. The dough rises higher and doesn't creep over the sides of the pan that way. Anyone know where to buy bread pans with high sides?

Homemade Wheat Bread Rising with Strip of Foil
Wheat Bread Dough Rising with Strip of Foil

Bread-Making Tips for Shorter Rise Time

Homemade sliced whole wheat bread
Homemade Sliced Whole Wheat Bread

I keep my whole wheat flour in the refrigerator to keep it fresh. When I bake bread, I put the flour I'll use in the microwave for 5-15 seconds per cup BEFORE mixing it in with the wet ingredients. This makes the flour nice and warm. Be sure not to "cook" it too long. You don't want to kill the yeast when you dump the flour in!

I measure the flour into a big glass microwave-safe bowl. Start by cooking it on high for 5 seconds per cup. Take it out of the microwave and stir it up. Does it feel slightly warmer than your skin? If not, microwave for a few more seconds. After you've done this a few times, you'll know how long to "cook" the flour for your next loaf. Be sure to stir it after microwaving, because the flour at the bottom seems hotter than the flour at the top.

I use quick rise yeast and don't need to let the bread rise twice. Immediately after kneading the dough, I put it directly in the bread pans and it rises quickly, usually within a half hour or so.

After the bread has cooled on a wire rack, I slice it with an electric knife. I put my loaves in the freezer to keep them fresh longer.

Monday, May 14, 2012

Men and Women and Hair

Men, Women and Body Hair


I've been thinking about the different standards American society assigns to men and women. Men can be as bald or as hairy as they want and are considered perfectly presentable. Women must be almost hairless except for their scalp hair and plucked eyebrows. This is not natural or fair, is it?

However, I notice that advertisers are telling men that unless they dye their hair and use certain shampoos women won't be attracted to them. In twenty years will American society demand that men also shave their body hair and wear makeup before they leave the house too?

Saturday, May 12, 2012

But Mom, You Didn't Tell Me NOT To Do It!

While my kids were growing up, they occasionally did something naughty. I came into the kitchen one day and my 2 boys were sawing away at our utensil drawer with knives. I said, “Hey, you guys aren't supposed to cut the drawer!” They replied in innocent voices, “You didn't tell us NOT to cut the drawer!” Suddenly, I felt a wave of frustration, helplessness and overwhelming hilarity all at the same time. What they said was true. I didn't tell them not to cut the drawer! Was I supposed to think of everything they shouldn't do and tell them before they did it? That was impossible!

Those 2 boys are now grown up and wonderful young men. The drawer still has the knife wounds but I think of that moment fondly now.